Rheonics sensor development team is constantly working to improve the sensor performance, add new communication and other functionalities. To roll out these additional feature updates, the sensors support in-field firmware update.
Firmware update requirements
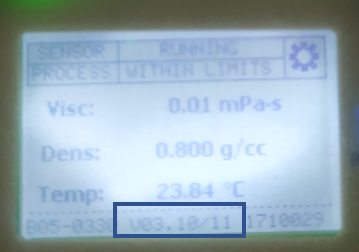
- Sensor should be running firmware version 3.00 or higher. This can be seen in the RCP (Rheonics Control Panel) or Display screen. See screenshots below.

- Firmware update is currently only possible using RCP software connected over USB or Ethernet
- RCP version 5.0 or higher (RCP shows version on the top bar)

What you will need:
- Updated firmware file
- Updated configuration file
The new firmware file and configuration file will be sent by support. Contact support for getting these files.
Before Starting
If you had custom configurations for communications, display, and 4-20 mA channels, that are not the defaults provided by rheonics when you received the sensor, please take note of these settings since it's possible that these get erased after firmware update, and will have to be recofingured by you once the process is over.
Firmware update procedure
Ensure sensor is powered by 24V DC supply and connected to RCP over USB or ethernet
Connection between SME and RCPIn RCP Software, go to "Logger" tab.

Click the "Update Sensor" button from the "Firmware Update" section
Select the binary file provided by rheonics support "Image.bin" and click "Ok"

A progress bar will display the file upload process.

Once the process is over, a window will prompt you to restart the SME. Click yes to accept. The restart process may take a couple of minutes or more. This is because the new firmware is being loaded into the system

Once the process is over, you may click "Refresh" button in "Settings" tab to check that version was updated properly. If the configurations of your SME were erased during the firmware update, you'll see that the sensor serial number will show as empty, or "No sn". To reload the configurations in the SME follow the steps below. Otherwise, the update process is finalized at this point.
In RCP Software. Go to "Settings" tab
Click the button "Enable Expert Mode"
In the pop up window input the support password: Jdc7bpPt and click "Yes"
 This action will enable the "Import" button. Click on it to import the configuration file provided by rheonics support team.
Select the configuration file that belongs to the sensor serial number that you would like to configure, and click "Ok"

If the upload process is correct. The import button will turn green, and the configurations will be exported as a file. Select the path to save this new file generated by the software, so you can send it to rheonics support.
Repeat the "import" process for all the files provided to you. Usually for firmware update, two files should be provided. Which means you will have to follow this process twice.
For more detailed information about loading configurations go to: