1. Getting Things Ready
1.1. Rheonics SRV, SRD, DVP or DVM w/ Firmware V03.20/0 or higher
1.2. Allen Bradley Micro820 2080-LC20-20QBB
1.3. Rockwell Automation CCW Version 12.00.00 (includes RSLinx Classic Lite 4.11.00 CPR 9
SR 11.0) and “EDS Hardware Installation tool 26.0.27.0”)
1.4. Windows 10 64 bit
1.5. RheonicsSRV.eds, RheonicsSRD.eds, RheonicsDVP.eds or RheonicsDVM.eds file
1.6. RheonicsSRVEval_micro820_4A.ccwarc and RheonicsSRVEval_micro820_4B.ccwarc file
1.7. Ethernet Switch
2. Rheonics Control Panel Setup
2.1. Connect Rheonics sensor, PLC, and PC (with RHEONICS CONTROL PANEL software installed) with an Ethernet Cable. We recommend using an Ethernet Switch.
2.2. Open RHEONICS CONTROL PANEL software and configure the RHEONICS CONTROL PANEL to use DHCP. Make sure it has a valid IP address. Figure 1 shows a standard configuration that can be used for the correct performance of the system. Then follow the next steps.
2.2.1. Go to the “Comm Configure tab” in the RHEONICS CONTROL PANEL; in the Ethernet section input all the parameters.
2.2.2. Click on the “Update SMET” button to upload the new settings into the SMET
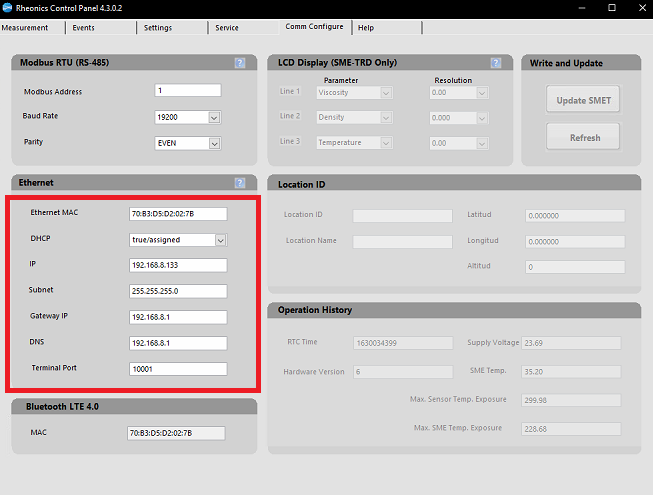
Figure 1. Configuration in RHEONICS CONTROL PANEL to use Ethernet IP with DHCP.
2.3. For Static IP address go to the “Comm Configure tab” in the RHEONICS CONTROL PANEL; in the Ethernet section click the dropdown menu in DHCP and select false (This will disable DHCP function)
 Figure 2. Disable for DHCP, this will allow Static IP Address
2.3.1. Fill all the parameters for the Ethernet/IP, remember to use valid values

Figure 3. Click in “Update SMET”
3. PLC Setup
This section explains how to navigate in the CCW software to configure the correct network settings. Rheonics provides a premade. CCWARC as a basic program for the Ethernet/ip connection.
3.1. RS Linx Classic
3.1.1. Once the software has been installed open the RSLinx Classic software.

Figure 4. Opening Rslinx Classic
3.1.2. Scan all systems in the network. To do this, click on “Rswho” button.
 Figure 5. Scan all network devices by pushing the” Rs Who” Button
3.1.3. Check for the following screen to be displayed:

Figure 6. Devices found with the RSwho function
3.1.4. Under the “AB_ETHIP-1, Ethernet” menu, the PLC and an unrecognized device with a yellow question mark will be found. (Figure 5. The latest in our SRV sensor, the .eds provided should be installed).

Figure 7. Unrecognized device for SRV electronic sensor
3.1.5.Follow the next steps to finish the .eds installation:
3.1.5.1. Open the EDS hardware Installation Tool

Figure 8. Open “EDS hardware Installation Tool”
3.1.5.2. Add a new .eds file with the help of software
 Figure 9. Launching the eds Wizard
3.1.5.3. Push the add button and select the RheonicsSRV.eds, RheonicsSRD.eds, RheonicsDVP.eds or RheonicsDVM.eds file.

Figure 10. Rheonics SRV.eds file
3.1.5.4. Push next button until the wizard finishes.
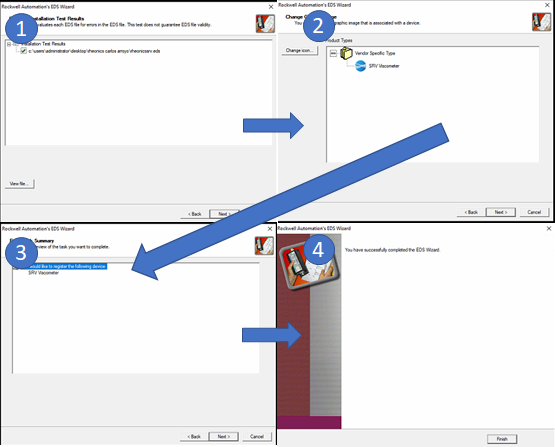
Figure 11. Rheonics SRV.eds installation procedure
3.1.5.5. Open Rslinx software once again and check for the question mark, the sensor should now be recognized and the Rheonics icon displayed
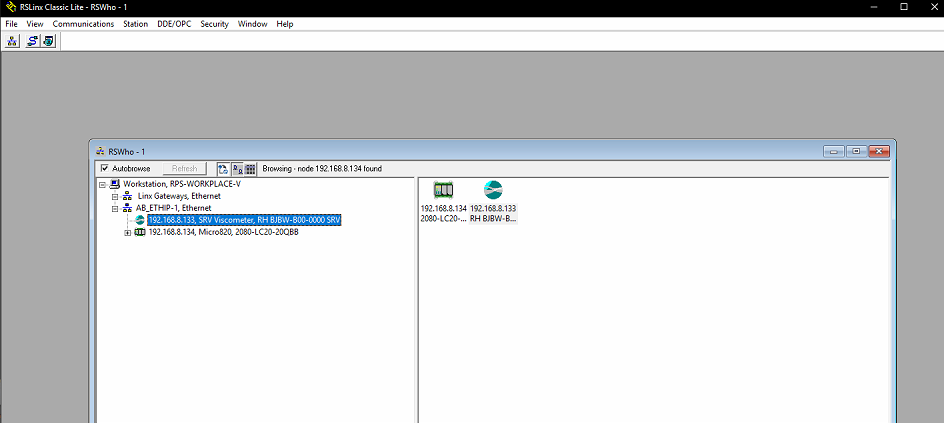
Figure 12. The. eds installed and showing rheonics icon.
Resources: